Continuing on Magento Admin, this the second part of our previous article, How to setup Paypal in Magento store? Express Checkout: Part 1 and here we’ll continue the same topic to complete the PayPal Express Checkout !!! Later we’ll discuss the PayPal Billing Agreement Setting either in the same article or in a new article(Part: 3).
Continue in Magento Admin Panel:
Before we start the article, again I would like to mention that setting PayPal is not an easy job to do. You might need a good understanding of every option or you will put your money on risk. However, we always recommend an expert to do this job for you and our hosting offers you experts free of any cost. As we promise, free web development and technical support through our customer executives 24/7 around the year. By buying our Pro and Plus Magento dedicated hosting packages you also get premium features like AspirationCDN, etc. The hosting Packages are available as low as USD 9.99 per month.
Basic Settings – PayPal Express Checkout: Step 3
So, we’ll begin by login our Magento admin panel. Simply by using the Magento credentials.
1. Let’s begin by setting the Scope only if you’ve multiple stores or views under the same Magento account. As all the changes made by us can be saved for a specific store view.
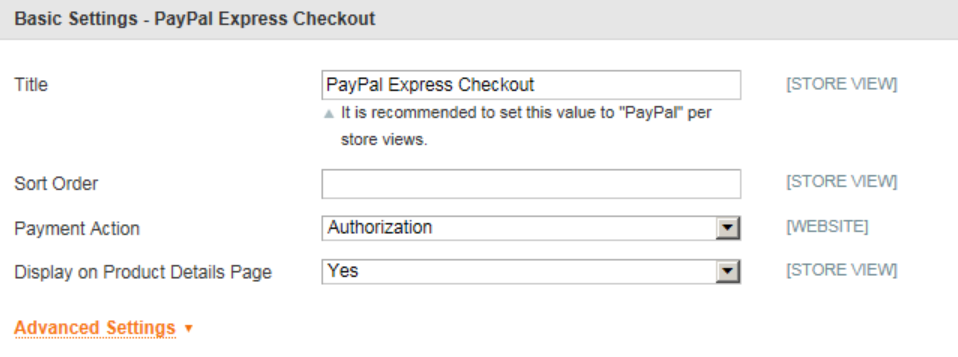
2. Now if you remember where we left in the previous article Basic settings of PayPal Express Checkout section make this following changes:
- To identify a payment method during checkout enter a “Title” of the method. You can choose any name but we always recommend the title “PayPal” for every store view.
- In case you’re offering various payment methods maintain a sorting order. So, you can easily determine the sequence. Also helps yo determine the PayPal payments methods working with each other. Remember based on the Sort order value the methods will appear in ascending order.
3. Now Set the any of the following payment action. There are three: Sale, Order, and Authorization pick one of them.
- If you choose the “Sale”, it’ll immediately withdraw the amount from the customer’s account. Because this is considered an authorized action to purchase.
- Either if you choose the “Authorization”, it’ll not withdraw the amount immediately but hold the fund instead. Until you capture the amount as a merchant.
- Else if you choose the “Oder”, it’ll neither capture nor authorize the amount immediately from the customer’s account, for example, credit card, bank account etc. Actually, the “Order” option is a mutual agreement between PayPal and Merchant account. The main feature of the payment solution is, that a merchant can withdraw the total amount of 29 days depending on the order made by the customer. As the option name, “Order”. Once the funds are in Order a merchant can claim the amount anytime any amount within 29 days. ***Remember the “Order” is a special feature of PayPal for Magento merchants. Isn’t it a great feature of PayPal and Magento?***
4. The next Step is for only those Magento Admins who set the “Order” as their payment options. Now to complete the setup of “Order” as payment follow the following steps:
Setting up the Authorization Honor Period (in days):
Generally by Authorization Honor period defines the total days, “Authorization” will remain valid. Here note, the value should be the same as per the corresponding PayPal account. By default, the value is 3 in the PayPal account. For making changes in default value contact the PayPal customer service. However, the authorization becomes invalid at every last day at 11:49 p.m., as per U.S. Pacific Timezone.
Setting up the Order valid period(in days):
Similarly, the Order valid period defines the total days, “Order” will remain valid. After the specific period, you cannot create an invoice for the specific order. Here note, the value should be the same as per the corresponding PayPal account. By default, the value is 29 in the PayPal merchant account. Again for making changes in the default value, contact the PayPal customer service. However, the order becomes invalid at every last day at 11:49 p.m., as per U.S. Pacific Timezone.
Child Authorizations numbers:
Generally, for a specific order, it defines the maximum number of authorizations. Basically, the Max Number of the online partial invoices can be created for a specific order. Again remember, the number should be the same as per the corresponding PayPal account. By default, the number is set to 3 in the PayPal account. Again for making changes in default number, contact the PayPal customer service.
5. Finally, to complete the Step: 3 we’ll now set the button to display on the product page. For setting “Display on Product Details Page” value to “Yes.”.
Advanced Settings – PayPal Express Checkout: Step 4
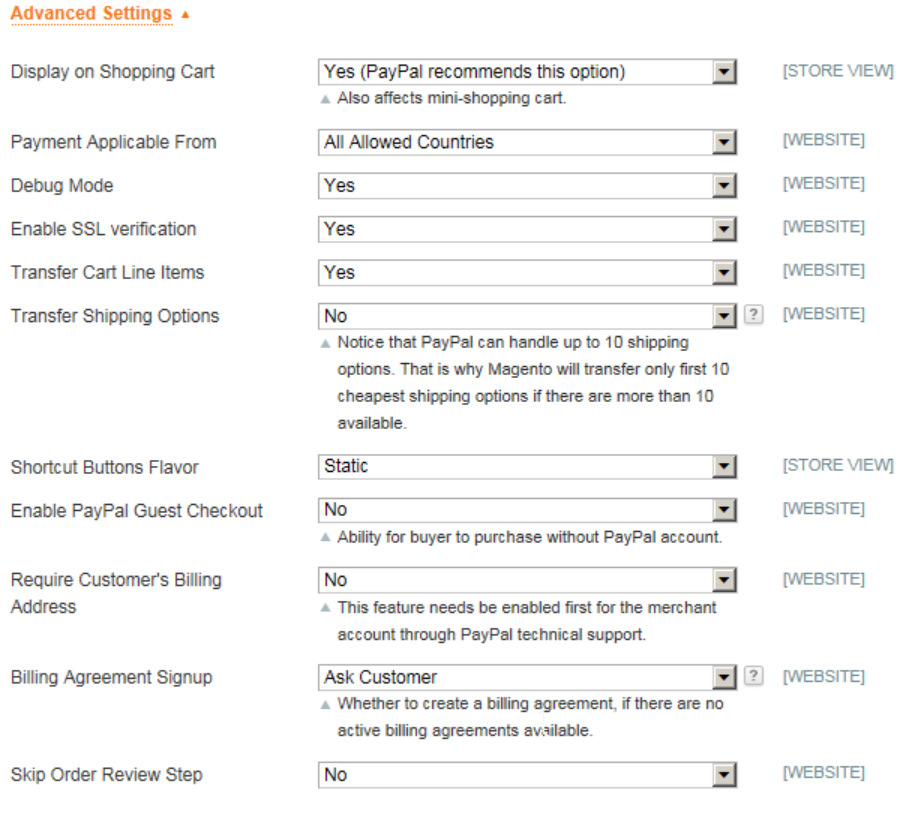
Click and expand the Advanced setting just under the Basic Settings. Now go through the following steps to complete the setup:
1. Setting Payment Applicable From :
Pick one of the following option to set the Payment Applicable form:
- All Allowed Countries, will accept the payments from all of the countries which are specified in our configuration by default.
- Again choosing Specific Countries, will accept the payments from the countries specified by the user himself. For specifying the countries hold on the keyboard and click the countries you want to include in Payment Applicable Form.
I found this option very useful for international shippers.
2. Setting the Debug Mode
By setting the Debug Mode to “Yes” actually we’re enabling the system log. The Log will now record every communication with the payment system. Cool !!! isn’t it? So from now on, we can see the PayPal payments log under payments_payflow_advanced.log file.
3. SSL Setting
For security and authenticity, change the value of SSL verification to “Yes”. So, every time it’ll run the Host Authenticity verification.
4. Transfer Cart Line Items & Shipping Options
Next, set the Transfer Cart Line Items to “Yes”. So, we can see the full summary of the customer’s order in line from the PayPal site.
Now, we can also set the Transfer Shipping Options to “Yes”. For including up to 10 Shipping Options in the summary. The option will only appear if the Line Items is set to Transfer.
5. Shortcut Button Flavor
We can also configure the type of image in the PayPal acceptance button. By setting the Shortcut Button Flavor to one of the following options.
Dynamic: PayPal will dynamically change the image time by time. I always recommend the Dynamic option.
Static: In contrast with Dynamic choosing the Static displays a specific image. That’s it!!
6. Guest Checkout
We never want to block the anonymous users (Not a Paypal account holder) to our store. As a merchant, we always prefer to take any type of Payment. For taking payment from Guest users through PayPal by other methods such as bank transfer, wire transfer or cards etc. Simply, we’ll set the value Enable PayPal Guest Checkout to “Yes”.
7. Customer’s Billing Address
Pick one of the following options as per own requirements:
- Here setting Yes will ask customers to fill in the billing address every time they make a purchase.
- Setting No will never ask customers to fill in the billing address every time they make a purchase.
- For Setting For Virtual Quotes Only, ask customers to fill in the billing address every time they make a purchase virtually.
8. Setting Billing Agreement Signup
To ensure when there are no active billing agreements available in the customer account, they can sign a billing agreement with your store in the PayPal system. In such a case, choose an option for them from the following to set the Billing Agreement Signup.
- Auto will set the customer to sign a billing agreement during the Express Checkout steps. Either they can use other payment methods.
- Ask Customer will set the customer to decide to sign a billing agreement during the Express Checkout.
- Never will set the system as the customer cannot sign a billing agreement during the Express Checkout steps.
Finally, the merchant will contact and apply to PayPal Merchant Technical Support. For enabling the billing agreements.
Remember the Billing Agreement Signup option should be enabled after the PayPal confirms the billing agreements for using in Merchant account.
9. Set Skip Order Review from Magento Admin Panel
Finally, to ensure the customer can complete the transaction from the PayPal site only. Without a return to our Magento store for an Order Review. We can set the value of Skip Order Review to “Yes”.
Again, we tried to cover the whole set here in this article but unfortunately, we need to read the following article for completing the PayPal Express Checkout setting for Magento Admin Panel.
How to setup Paypal in Magento store? Express Checkout: Part 3