So, we’ll continue here from our previous article, How to setup Paypal in Magento store? Express Checkout: Part 3?. Till now we have discussed the advanced settings and already mentioned the PayPal Billing Agreement in our earlier article. So, here we’ll begin with PayPal Billing Agreement Settings in our Magento local admin panel.
As you have reached the final part of the Paypal Express checkout you should have got the idea that setting Paypal is not a simple task. Before hiring a developer for setting up your payment method we’ll request you to pay a visit to our Magento Hosting packages. Enjoy our web development services absolutely free with our dedicated Mage hosting plans with efficient customer service 24/7 around the year. Our packages begin at USD 9.99 per month including a straight 30% joining bonus.
Tanzia Farin Chy for Aspiration Hosting
Magento Local Admin Panel – PayPal Billing Agreement Settings
Straight from the definition, a billing agreement is a Sales agreement. Generally, in PayPal the agreement is made between the merchant and the customer. This agreement is authorized by the Paypal and used for multiple orders.
However, the Billing Agreement payment options only appear for the customers who are already in a Billing agreement with your company while checking out.
As a result, the payment system issues a unique reference ID after PayPal authorizes the agreement. Alike, purchase order, there is no limit in the number of billing agreements. So, a customer can set up a numerous number of billing agreements with your company. Also with the unique reference ID, we can identify each order that is connected with the agreement.
PayPal Billing Agreement Settings – Step by Step
1. To avail billing agreements to your customers, open the PayPal Billing Agreement Settings in Magento Local admin panel.
2.In the Magento local admin panel set the option “Enabled” to “Yes”. Now follow the following steps to complete the setup:
- To identify the PayPal Billing Agreement method while check out, enter a title.
- Next, for offering multiple payment methods, enter a number in the Sort Order field. It’ll determine the sequence of the in which the Billing Agreement appears during checkout.
3. Now set the “Payment Action” from the following options:
- Authorization: accepts and approves the purchase. But also hold the funds until the merchant makes the request to capture the amount.
- Sale: is authorized by default and immediately withdraw the funds from the customer’s account.
4. Next again using Magento Local Admin Panel, set the “Payment Applicable From” to anyone from the following options:
All Allowed Countries: accepts payment from the countries that are already has been configured by you.
Specific Countries: accepts payments from specific countries. For Windows and Mac users press the Ctrl/Option key and click each country to accept payments from those countries.
5. Now set the “Debug Mode” option to “Yes”. As a result, it’ll record communications with the payment system and save them in a log.
Don’t worry as we can find the log file in the server. And concerning security, only the developers can use the log files. Also, sensitive information such as credit card details cannot be recorded using log. To ensure compliance with the PCI Data Security Standard.
6. Again to make sure the security “Enable SSL verification” to “Yes”.
7. Now set the Transfer “Cart Line Items” to “Yes”. In the customer’s order on your PayPal payments page, it’ll display a summary of each line item.
8. Finally, set the “Allow in Billing Agreement Wizard” option to “Yes”. By enabling the same we allow our customers to initiate a billing agreement from the dashboard of the customer account.
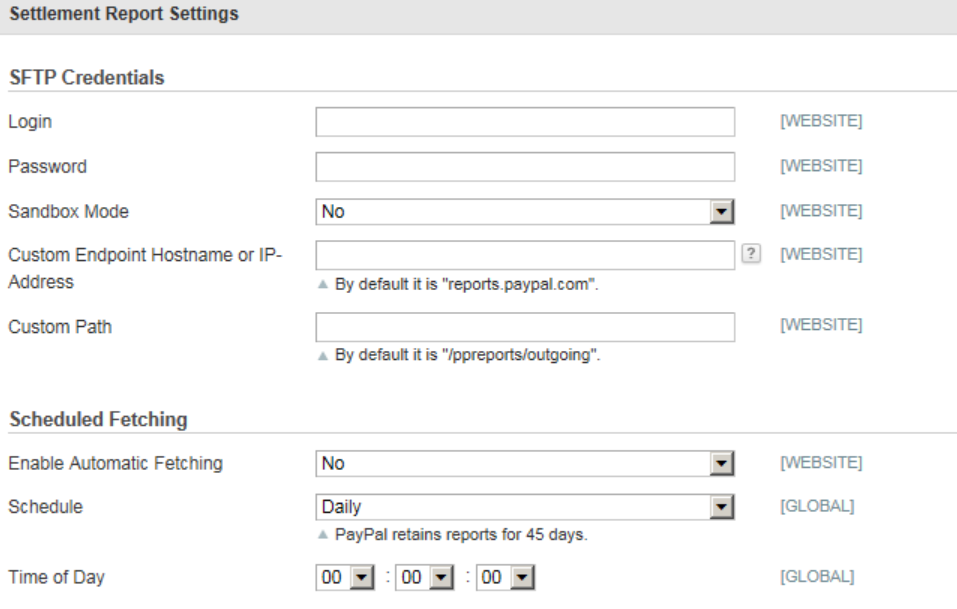
Magento Local Admin Panel – Settlement Report Settings
Go through the following steps to quickly set up the Settlement Report.
1. From the Magento Local Admin panel click to open the Settlement Report Settings.
2. PayPal’s Secure FTP Server users simply enter the SFTP credentials to log in. Basically the Login ID and password.
3. Now, set the “Sandbox Mode” to “Yes” to run test reports. Before going live with Express Checkout on your site.
4. Next, include the IP Address Custom Endpoint Hostname. Generally, by default, the value is set to the following address.
reports.paypal.com
5. Now change the Custom Path to save reports in the custom location. Generally, by default, the value is set to the following:
/ppreports/outgoing
6. Next set a schedule to generate reports on a regular basis. Navigate “Scheduled Fetching” and make the following changes to generate reports:
- To begin with, set the “Enable Automatic Fetching” option to “Yes.”
- Now we have a list of options pick one from the following list.
1.Daily
2.Every 3 Days
3.Every 7 Days
4.Every 10 Days
5.Every 14 Days
6.Every 30 Days
7.Every 40 Days
Generally, the PayPal reserve each report up to 45 days.
7. We can set the specific “Time of Day” to the hour, minute, and second. As per the settings, Paypal will generate reports on a regular basis.
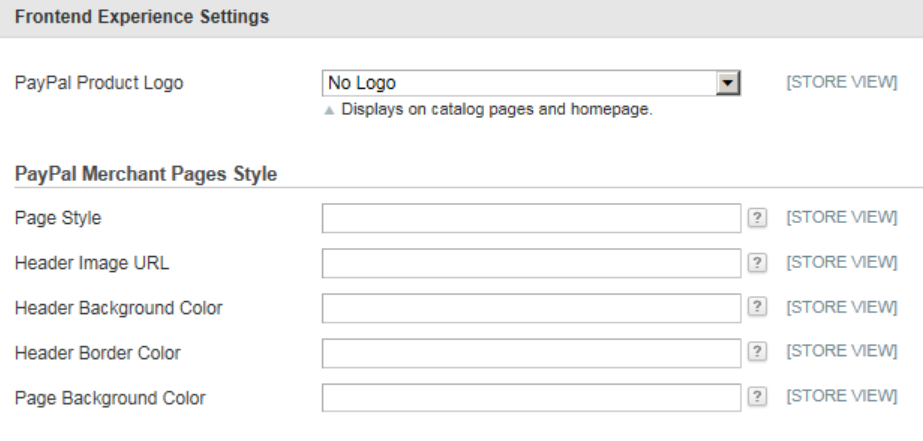
Magento Local Admin Panel – Frontend Experience Settings
By using the Magento Local frontend experience settings we have the opportunity to choose PayPal logos to appear on your site. And we can also customize the style of our PayPal merchant pages.
1. Ok, let’s begin by expanding the Frontend Experience Settings tab in the Magento Local admin panel.
2. Now choose one of the “PayPal Product Logo” to set to appear in the PayPal block the store. Here we can see, the PayPal logos in four styles and two sizes. Following are the options:
No Logo
We Prefer PayPal (150 x 60 or 150 x 40)
Now Accepting PayPal (150 x 60 or 150 x 40)
Payments by PayPal (150 x 60 or 150 x 40)
Shop Now Using PayPal (150 x 60 or 150 x 40)
3. Do the following customization to set the PayPal merchant page appearance.
Now enter the name of the Page Style. Following are the options:
- PayPal: will use the PayPal page style.
- Primary: sets the page style as the “primary” style in the account.
- your_custom_value: sets custom page style into payment page.
- Now include the URL of the image that you want to appear in the Header Image URL field. Generally, the option appears on the upper-left corner of the payment page. You can upload the maximum file size which is 750 x 90 px.
- PayPal always recommends secure (https) server as the location of the image. Or the client will the following warning: “the page contains both secure and nonsecure items”.
To setup colors to the following include the six-digit hexadecimal code without the “#” symbol:
- Header Background Color.
- Header Border Color.
- Page Background Color.
Finally, click the Save Config button to end setup. Congrats we have successfully added the Paypal Express Checkout in our Magento store.