As a developer or merchant, we are must be familiar with the Magento 2x Dashboard. Today we’ll discuss the Magento setup and options of System Menu in detail under the dashboard. Because Magento 2x comes with many different functionalities need the attention of merchants and developers. By learning the options in depth we can make use the advanced features of Magento 2x which ultimately relates our goal and business target.
Undoubtedly, Magento has become the Number 1 CMS around the eCommerce industry in the last few years. As they have improved the overall system targetting the eCommerce businesses, developers, clients, and merchants, etc.
Likewise Magento 2x, we need to consider a few things before start developing our first online store. For example, we can take CMS, hosting, domain, development support and strategy, etc. Here as you’re reading this article, we can assume that you’ve already chosen the Magento as CMS. As a developer, truly speaking, Magento is software on the heavier side due to its mighty functional Dashboard. So, for Magento Merchants, there are no options left to go with a hosting that is compatible with Magento 2x and later version. Either both user and client might face a lot of issues regarding overall performance and speed of the site.
To solve the issue, our hosting ensures exclusive features such as SSD cloud storage, 99.99% uptime, Aspiration CDN, & LiteMageCache, etc. Also, we’re ensuring web development & 24×7 customer support along with the plus and pro hosting plans. So, you don’t need to hire an extra developer to set up the System Menu. Our “Dedicated Magento Hosting Plans” begins with a price tag USD 9.99 per month.
Also, don’t forget to use the promo code for a discount.
Tanzia Farin Chy for Aspiration Hosting
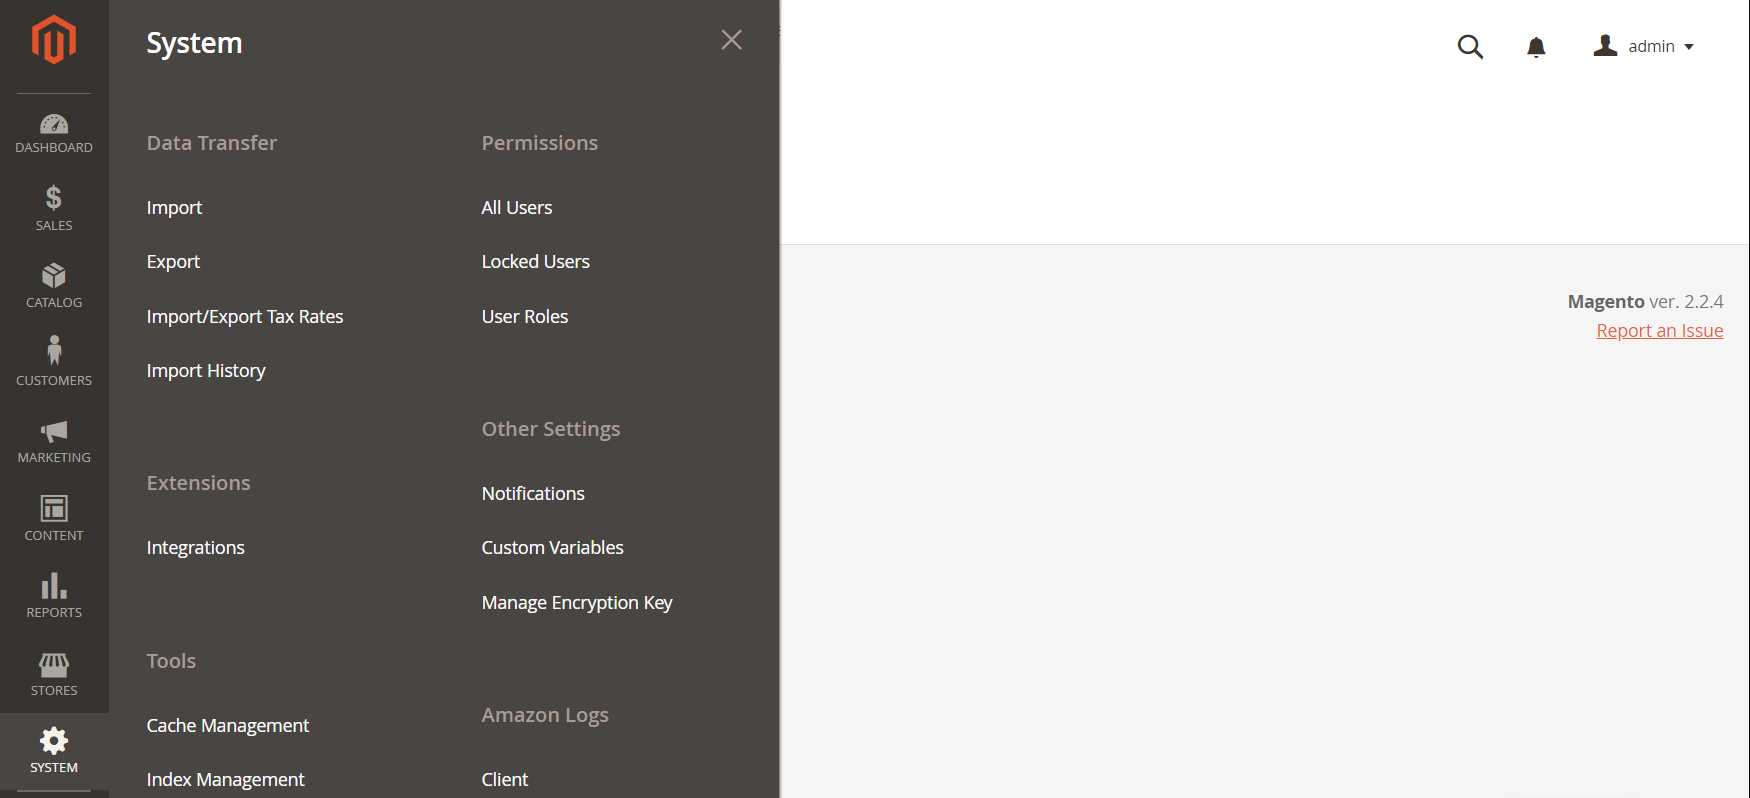
As a quick overview, the System Menu comes with the tools for importing and exporting data, installing extensions, managing the system caches and indexes, managing permissions, creating backups, etc. It, also includes tools such as system notifications and custom variables.
Magento Setup tutorial – The System Menu
First, simply login into the Dashboard using the credentials. Now on the Left-Sidebar under the Dashboard, you can see the Magento Main-Menu. Next, simply click the System icon to enter the Menu. Now I’ll try to describe every single option under the System Menu and there are 6 major options in total:
Magento Setup tutorial – The System Menu – Data Transfer
Under this option, a tool such as Import and Export gives you the ability to create and edit multiple records by using a single operation. Not only we can import new items, but also can manage sets of products by updating, replacing, or deleting operations. Such as using this tool you can fill the inventory by adding new products and can also update product description. Also, we can modify the price by accessing the advanced price data. Moreover, this option gives us the power to replace a new product set with existing products. In the case of a large catalog of products, this tool comes very handily to export the data. Later, we can edit the data in an excel or CSV file which we can import back into our online store.
Magento Setup tutorial – The System Menu – Extensions
One of the main reason Magento becomes number 1 among developers and merchants as a CMS is Magento open source extensions.
Extensions – Integrations
This option establishes the location of OAuth credentials by redirecting the URL for third-party integrations. Also provides the required integration for identifying the API resources available.
How does integration work?
- First of all, it can authorize the integration. For doing the same, go to the system>>integration option. Now under the following screen find the specific integration which is relevant and simply authorize it.
- Later the system will verify and later on establish a connection by the login. Next directs and also accept the access request. In case if you’re redirected to a third-party, simply log in to the system. For newbies, you might need to create a new account. By completing a successful login, you will be returned back to the integration screen.
- Next, you’ll receive a confirmation notification of integration. As the system sends notification such as the integration has been made successfully. Later on, by completing the integration and receiving the credentials further we do not need to make a call every time for accessing third-party extensions.
How add a new integration?
By following a few simple steps we can integrate an extension successfully: In our Admin sidebar, click on System. later choose Integrations under Extensions tab.
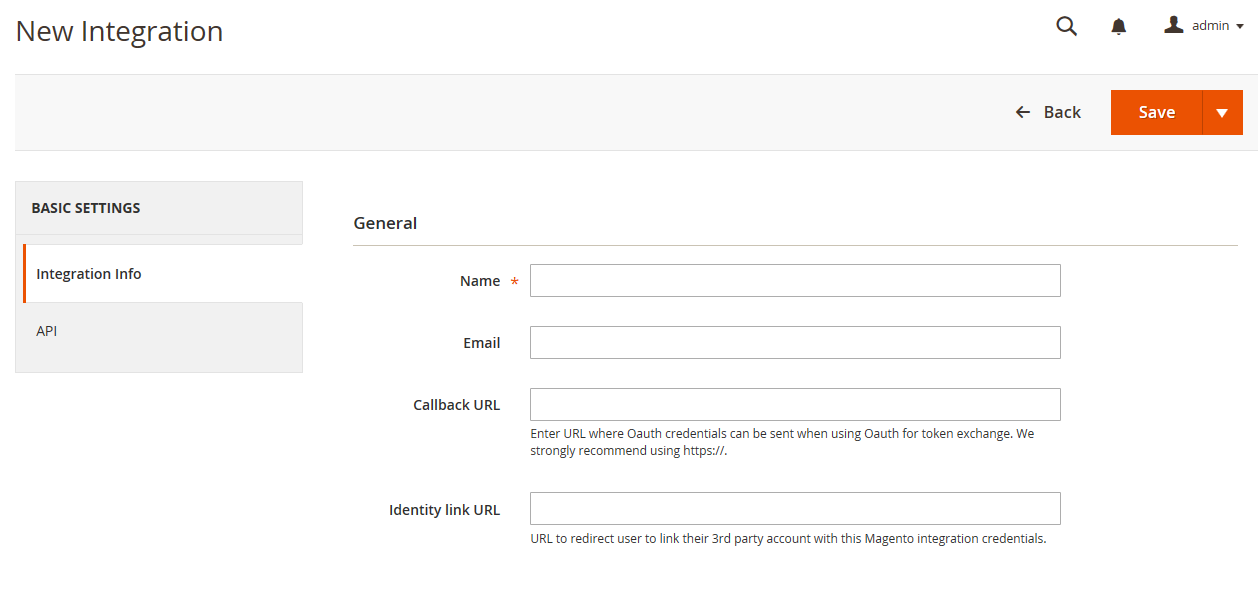
Now enter the Integration Info as described following :
First, begin with entering the Name of the integration along with the Email address.
Secondly, write down the Callback URL for OAuth credentials. As the system will send the OAuth credentials everytime we use OAuth for token exchange. For security reasons we always recommend using https:// links only.
Thirdly provide the Identity Link URL. This URL will redirect the users to a third-party account with our Magento integration credentials.
Later using the panel on the left side, choose API.
- Finally, go through the following steps:
- Set Resource Access: All or Custom
- Mark all the box of each resource that is necessary for custom access as the following screenshot:
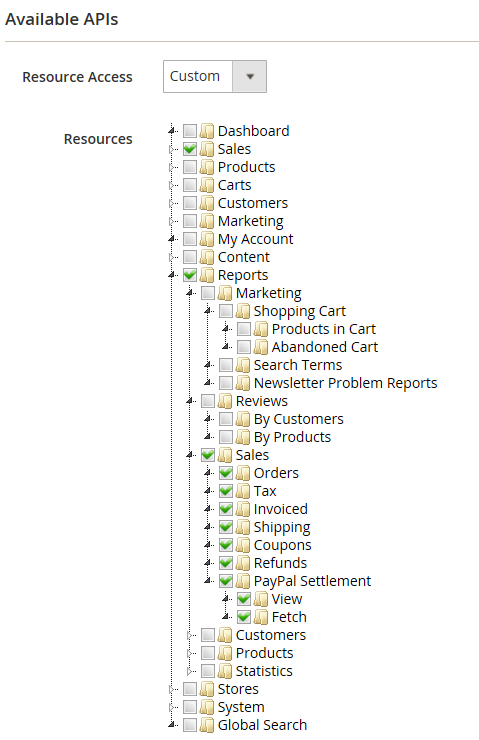
Finally, click save and complete.
How to set up the security setting of API guest access?
However, the Anonymous guest access to CMS is not by default. Because the system has no permit for the catalog and other few store resources.
In case you need to edit the settings, follow the following steps:
First, on the left- sidebar under Admin panel, click Stores. Now choose Configuration under the settings.
Secondly, on the left panel under the Services tab, select the Magento Web API.
Now open the Web API Security Setting section as following:

Next, permit the Anonymous Guest Access by selecting “Yes”.
Finally, click save and complete the setup.
As the Magento Setup for System Menu is a wide concept to cover on a Single article. Read here about the other options under Magento System Menu on Magento 2x Dashboard Tutorial – System Menu – Part 2